Monday, 28 January 2013

My Australia Day weekend

Happy Australia Day long weekend everyone! We've had a house focused weekend which has been great and very productive.

They say a picture is worth a thousand words, and given how much has happened this weekend I think it's the best way to tell you all about it...

The weekend started off brilliantly when my much awaited copy of How to Decorate arrived in the mail- I think it may have set the scene...

Saturday started at this junk yard in Reservoir (I can't even tell you what it's called, because I don't think it actually has a name!) where we were on the hunt for some timber to make a desk (more about that later).

We came away with this beautiful timber (left) and 2 vintage ladders which I had been looking for, for ages! All for a grand total of $75- bargain!
While Paul started work on the desk I planted some rocket and baby cos (in a pot on the deck so the possum/s hopefully won't eat it!) in this half wine barrel we picked up from Bunnings...
...and some more tomato plants in the herb garden where there was some space.
On Sunday we went for Bunch with friends at our favourite place Cheshire.  If you're in the Northern suburbs of Melbourne and are looking for great brekky food, I highly recommend it! The others all went for a motorbike ride in the afternoon so I had the opportunity to kick back with a peppermint tea, and my new book! I was kept company by our babies; Maddie (left) and Millie (right).
After a clean and some repair work, one of the ladders was ready to come inside.  I've put it in the spare room with some of my treasures on it.  See the Elephant and Bunnies? My Mum painted them for me back in the 90's when ceramics was the thing to do- pretty cute!
Monday morning I made us brekky in bed.  We lazed around for a bit before mustering up the courage to face Ikea where we going to pick up the trestle legs for the desk.
After Ikea, we took a well earned break on the rooftop deck at Naked for Satan in Brunswick St...
...and admired the view on this amazing Melbourne day.
On the way home, I picked up these beautiful flowers and now it's time to start getting ready to face the week- urgh!
Paul's still outside transforming that beautiful wood into a desktop.  Not only will we have a new desk, but I'm taking the opportunity to makeover our study, which I'm super excited about! I will be sharing what we did with you as soon as it's done, so keep your eye out here!

Wednesday, 23 January 2013

Upstairs, downstairs?

The last week has seen some serious reno discussions regarding the back half of our house.

Our current floor plan
When we first moved in, our plan was to work with the footprint that we had and make minimal changes to the layout. But it's so true what they say about living in a house for 2 years before making any major decisions/changes- our plans have changed significantly since then.

Our thoughts late last year were that we were going to pull down the 70's "lean-to" at the back of the house and rebuild it with a second floor. In addition to this there would be some internal changes to the layout of the front of the house. We certainly hadn't locked in the details, but we definitely had lots of ideas and were pretty close to engaging a draftsman.

We also had some discussions with our brother in law (who is a builder) about some possible options and the best way to do it without moving out (what are we thinking?!). He had some really good suggestions and thought our best options would be for three stages of building starting with re-stumping (boring, but necessary) and the front bathroom, back half and upstairs (we live in the front) and then front half (we live in the back).

We thought that we were on track until Boxing Day when we were having a casual lunch of leftovers with my Mum and Aunty outside and I realised how far I was carrying the food from the kitchen to the back deck. I had planned to keep the kitchen in its current position, flowing into an open plan dining and living room with bi-fold doors leading onto the deck. But with the kitchen in its current spot, it just doesn't quite work with the image I have of all the amazing alfresco dining we're going to be doing! I definitely want the lounge area opening onto the deck so that it has an indoor/outdoor feel so moving the kitchen in that spot wasn't really an option for me. After much thinking and staring at the space (people think I'm weird, I'm not sure why!) I thought I'd found the place for it. The dining room could go where the kitchen currently is, the kitchen where the laundry and bathroom are (including an amazing pantry) and the lounge stays where it was always going to be. Great so we're pretty much sorted then right? Hmmm wrong!

I think reality started sinking in over the weekend and I had a bit of a panic about the cost, time, upheaval, 2nd floor, overcapitalising etc etc and so I put the "working with what we've got" option back on the table including lifting the height of the roof in the back half. Paul has been pretty good (after the initial "are you serious?" reaction) and so we've been tossing around ideas. We're in the process of running through a bit of a pros and cons list for each of the options. I have a feeling I know which option we both prefer (bigger is better, right?!) but it is important that we consider all the options in the hope that we make the right decision for what is going to be a pretty major change either way.

So that's where we're at right now, but I would love your thoughts...should we go upstairs? Or just stick with downstairs?

Wednesday, 16 January 2013

Vintage...or not to vintage


While the ideas, "what if's" and general renovation chatter continues to pick up pace in our house, I am very excited that I have purchased our first post-reno light fittings!

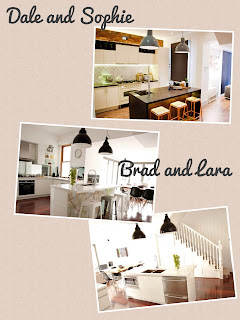
My love for vintage industrial light fittings started when Sophie and Dale and Brad and Lara used them in their kitchen's on The Block 2012.

Since then I have been keeping my eye out for some (I mentioned in my post last week about the amazing story of the vintage pendants from Department of History in Thornbury) but I have to say that I was finding the price of $250-300 per pendant a little hard to swallow.

Then, late last year I came across the Hektar Pendant lamps when I was at Ikea and I was impressed. As you can see below, the are black with white inside, exactly what I was looking for and in the last place that I expected to see them! Unfortunately it seemed I wasn't the only one who thought this, and there was only one of the small pendants in stock.  So I took the one that was there but I decided I needed two of the large pendants and two more of the small pendants.  I'm planning on using them above the island bench in the kitchen and above the dining table. I will figure out the specifics of which pendants go where when the time comes and I can physically see the space.
On the weekend I discovered that there were some in stock at my 'local' store in Richmond.  I was down there in a flash!  I have to admit that the large pendants were much larger than I expected and it probably would have been helpful to either have an extra pair of hands or a trolley, but I struggled through! After the nightmare that is the Ikea pick up zone (and one stubbed toe later!) I had my full set of pendant lights home.

So, why did I decide "not to vintage" on this occasion? I have to admit that I sometimes get sick of things quickly and I actually can't guarantee that I will love these pendant lamps forever (not to mention that when/if we sell the house I can't take them with me).  I'd rather invest in the long term and big ticket items such as the kitchen and bathroom fittings and appliances and also on the furniture that I know I will have forever. I agree that the Ikea pendants don't contain quite the same character or story as the real deal vintage ones do, but considering it cost me $300 for all 5 of the pendants compared to that price for one, it's a compromise that I'm willing to make.

It's my house, my style and I have to go with what I love- and I do love them.  I don't feel like I'm missing out on anything and it makes me really excited about the day when I can finally hang those pendants in my new kitchen and dining room.  Here's hoping I still love them by then...

Tuesday, 8 January 2013

Weekend Project: Furniture makeover


After a busy December, it was a welcome relief to realise we had nothing planned for last weekend. After a wonderfully relaxed Saturday morning of brunch and wandering around our local second hand stores (and hearing all the history of some amazing vintage light shades from Spencer Street station at one of them) I decided that I was going to tackle a little project in the afternoon.

I have a hall table that was once my Nanna's. I've been using it as a bedside table in the spare room and thinking about giving it a makeover for a while.  I have previously had a lot of dark furniture but I'm slowly making the transition to lighter wood or white as I think it looks really fresh.  I'm loving the rustic look of whitewashing and decided that was what I wanted to do with this table. So I did some research on trusty Google (what did we do before the internet?!) and found some really great instructions.

This is what the table looked like before I started (right). The website I used, contains detailed instructions but I will run through what I did.

I started off by sanding the table back to remove the varnish.  You need to remove the shine of the varnish but it's not important to get it even all over, in fact an uneven finish is probably better as it helps add to the rustic look of the whitewashing. I used two electric sanders; a larger sander for the larger, flat surfaces and a smaller sander for the legs and any more detailed parts.
 
It took me about an hour to sand the table and here's what it looked like when I was finished (left). You can see there are some areas particularly on the top where I have sanded back further than others to create a rustic/worn look. Once I was finished the sanding I wiped the table down with a damp cloth to remove the dust.

I then made the whitewash mix by mixing 50% of a white water-based paint (any water based interior paint from Bunnings should be fine) and 50% water.  I then got a rag (an old cotton singlet) and used the rag to apply the paint to the table.

By using a rag instead of a paint brush I believe that I achieved a better result. Because the paint is thinned with the water, it dries fairly quickly.  I ended up doing about 2/3 coats and stopped when I felt that I had achieved the look that I wanted.


This is what it looked like (right) when I finished the whitewashing and then I put it in the sun for a couple of hours to dry. I have to say that whitewash is really forgiving and I don't think you can possibly do it wrong!

Once it was dry I applied a clear lacquer with a paintbrush to seal it.  I then had to wait for the lacquer to dry but it didn't actually take that long until it was dry to touch and it was ready to go!

I was really happy with the finished product and couldn't wait to get it inside and do the fun part, the styling!

Here's the finished product set up in my lounge room displaying some of my favourite things!  I love the fresh whites with a touch of black and pink which ties in with the colour scheme of my lounge room.


The makeover of this table meant that I removed two other tables from the lounge room, one of them replaced this table as a bedside in the spare room and I also moved some of my smaller pieces around from room to room. One of the things that has kept me (partially!) sane is doing lots of little things to make the house look nice with the layout we have and I like to move them around to keep things interesting.

I also had a wander around the house looking for other things to whitewash (typical me, once I get started I like to go overboard!) and also started on another little cupboard.  The whitewash has come up great but needs some other work on it, so that there's a little project for me for another weekend!

Wednesday, 2 January 2013

Getting started...

So...after much hesitation here I am writing my first post on my brand new blog! I've been thinking about starting this for a while now and I guess I'm probably not alone in picking the New Year as the "perfect" time to finally dive in!

In my preparation (although probably more accurately described as procrastination!) for starting the blog I read a lot about what to do, what not to do and I have to admit it was all getting a bit overwhelming. I really have to thank one of my good friends who just today gave me the encouragement I needed to get started.  
Our conversation over lunch went something like this- 
Me: I'm thinking about starting a blog about our house reno's...
Her: Cool! 
Me: I'm not sure though
Her: Why not? Just do it! (She's great like that, thanks KV!) 

So here I am "just doing it" and trying to get into the flow of writing my first post. I'm really hoping to be able to share some interesting things about our journey over the next...well who knows how long! The more my husband and I discuss things, the longer time goes on, the more ideas I have...I'm starting to realise it's going to be a much longer timeframe that what I first imagined! See, I'm a first time home owner, first time renovator and I'm also pretty impatient- a recipe for disaster right?! In my delusional mind I actually thought that we'd be finished by now! Ha, we've hardly even started! My husband has done this type of thing before and luckily he's pretty handy but the poor thing has a hard time managing me and my expectations- let's just call that another work in progress!

Between us, I know that we're going to make a beautiful home, but there will definitely be a lot of bumps along the way! If nothing else, this blog will be a great way to record the progress that we make but I also look forward to sharing our experiences and also learning from others along the way!
Alright, now I better go and explain to my husband what I'm doing, starting with exactly what a blog is....